
Qoddi automatically builds your Java app from your code.
To do that, Qoddi uses buildpacks to detect and build your app automatically.
The Java buildpack offers several ways to build your code from source or a compiled artifact.
For Gradle support, check this article.
Before Building your app
A pom.xml file and a Procfile placed at the root folder of your repository is mandatory for Qoddi to be able to build your Java app. See below to use a Procfile.
The jar file created by Qoddi will use the name provided inside your pom.xml file:<artifactId>my-app</artifactId>
<version>0.0.1-SNAPSHOT</version>
will create the Jar file on /workspace/target/my-app-0.0.1-SNAPSHOT.jar
Create your app on Qoddi
Create a new app and link it with your repository using SSH keys.
Read this article for a detailed procedure or check this video :
Procfile
The Procfile informs the engine of the type of app you are running and prepares the infrastructure accordingly. The Procfile always starts by web: regardless of your app type (web or worker).
web: java -jar /workspace/target/myapp.jarSpecify a Java Version
If you don’t use the Default version and specify a Java version in your pom.xml, you need to specify the same Java version inside a file called system.properties to your repository.
Set a property java.runtime.version in the file:
java.runtime.version=11Supported versions
- Java 7 –
1.7.0_352 - Java 8 –
1.8.0_345>> Default version - Java 11 –
11.0.16.1 - Java 13 –
13.0.12 - Java 15 –
15.0.8 - Java 17 –
17.0.4.1 - Java 19 –
19.0.0
While minor versions are supported, we recommend you always use the major version (like 11) instead of a specific minor version to ensure your app stays updated automatically by the builder in case of security or critical updates.
Accepted major version values are 1.7, 1.8, 11, 13, 15, 17, 18 and 19. Because the default is 1.8, you don’t need this file if you want to use Java 8.
You can also pin your JDK update version by using a value such as this:
java.runtime.version=1.8.0_345
However, we encourage you to use the more general 1.8 format, which will automatically install any security updates.
pom.xml
This file is used by Maven, the dependency manager of Java. It’s required for the app to build.
You can create this file by running locally mvn archetype:create
Using the Zulu JDK
In addition to the standard JDK you can run the Azul Zulu JDK with Qoddi Java apps. Zulu is an Open Source certified build of OpenJDK and 100% compliant with Java OpenSE standards.
To use Zulu JDK write your system.properties file like this :
java.runtime.version=zulu-1.8Maven Version
system.properties can also be used to specify the Maven version to run :
maven.version=3.6.2Accepted versions of maven are :
3.2.53.3.93.5.43.6.2
- The default version is
3.6.2
Support for Springboot and Thorntail
The Java buildpack automatically detects Springboot and Thorntail frameworks and creates the appropriate commands.
For Springboot :
java -Dserver.port=$PORT $JAVA_OPTS -jar target/*.jarFor Thorntail :
java -Dswarm.http.port=$PORT $JAVA_OPTS -jar target/*.jarIf a Procfile is present those commands will be ignored.
Using a custom Maven Settings file
A settings.xml file determines the Maven configuration. Read more on this page.
When a file settings.xml is present inside the root directory of your code, Qoddi will use it to configure Maven.
Alternatively, the emplacement of the settings.xml file can be set as an environment variable (before build) with the key MAVEN_SETTINGS_PATH (local file) or MAVEN_SETTINGS_URL (hosted on a URL)
Using password protected repositories
You can use any environment variable of your app (to be set before the app build is required) to use inside the settings.xml file : ${env.ENV_VAR} where ENV_VAR is the name of your variable. Never store passwords inside your code repository but use the environment variables to do that.
Here’s an example with settings.xml file using a private repository like Jfrog Artifactory hosted version :
<servers>
  <server>
    <id>my-private-repo</id>
    <username>deployment</username>
    <password>${env.MY_JFROG_PASSWORD}</password>
  </server>
</servers>
Launch a Console Command
Please check this article on how to launch a command directly to your running app. This can be used to perform database migrations, launch local scripts, or perform database backups.
Ephemeral Disk
Contrary to Marketplace apps that can use Qoddi’s virtual disk features to store and retrieve persistent data, apps that are created from code use an immutable file system.
You can write data locally, for instance, to process files temporarily during your application life, but the data written into your app’s disk is not persistent and gets wiped out after your app restart.
All apps restart at least once every 24 hours, to apply a new setting or to deploy a new build.
To store data and keep it persistent you can use external services like Amazon S3 or Wasabi, an S3 compatible storage service with very affordable pricing.
Add a domain name
Please check this article for a detailed method on how to use your domain name with FlashDrive apps.
Define environment variables
Note: Environment variables set in your app settings are injected during the build process. If the build of your app needs to use an env variable, make sure to set it before requesting the build.
Qoddi lets you externalize the configuration of your app: the Qoddi cluster will automatically inject the data when the app starts or restart.
Environment variables can include any external data your app needs to run like external resources, database addresses, encryption keys, etc…
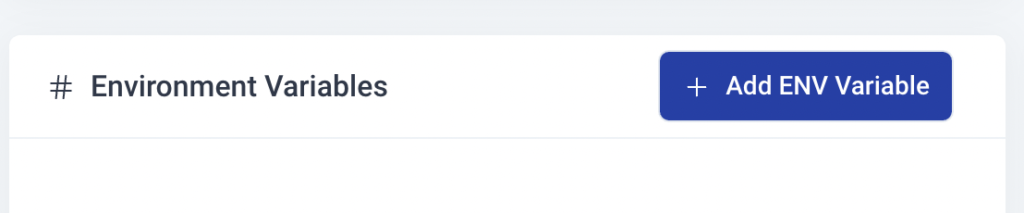
To add an environment variable, access your app settings and click “Add ENV Variable” :
Enter the key (like DATABASE_USER) and the value and click “Add”. Qoddi will automatically add your environment variable and restart your app after a one-minute delay (to let you add more env variables if necessary without restarting the app each time a new variable is added).
Provision a database
Qoddi Marketplace includes all popular datastore engines, including Mysql, Postgres, MongoDB, and Redis.
To add a database to your app, click on Marketplace and select the database you want to run, then create the new app database inside the same stack as your Python app.
Once the app is running, visit the database app’s settings and retrieve the “internal name” :
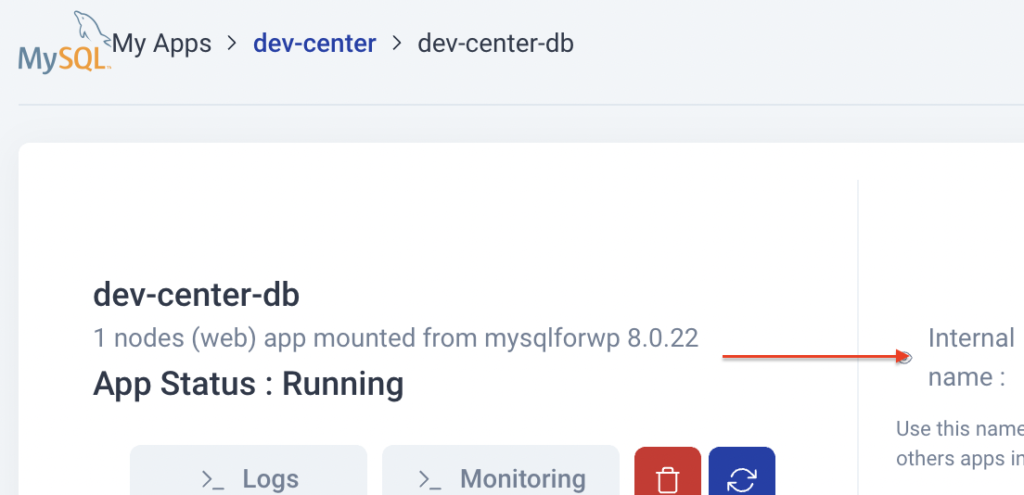
Use this internal name as you would use a server address, for instance for MySQL this name replaces the usual “localhost”. Some scripts require you to add the database port at the end of the server address. Qoddi uses a common port for each database software, for MySQL it will be 3306 and you can write it like that inside your scripts: internal-name:3306
Postgres usually uses credentials sent inside the login URL, like that : postgres://<user>:<password>@<internalname>:5432/<database>
The login and password information is available inside the Environment Variables of the database app.
Note: Qoddi’s datastores run on a private and encrypted network. Therefore SSL support is deactivated for all datastores available on Qoddi. Ensure that your code doesn’t require using SSL before deploying your app.
Java and Postgres databases
If you deploy a Postgres database on Qoddi with Java you need to use the JDBC driver with the SSL mode disabled. Qoddi automatically creates a JDBC_DATABASE_URL with the sslmode set to disable if you deploy your database at the same time as your app.
You can connect directly using this environment variable, for instance, with Spring:
spring.datasource.username=<username>
spring.datasource.password=<passw>
spring.datasource.driver-class-name=org.postgresql.Driver
spring.datasource.url= ${JDBC_DATABASE_URL}
If you use the JDBC_DATABASE_URL make sure the DATABASE_URL environment variable is removed from your app to avoid conflicts (the builder should remove it automatically).
Other databases (like MySQL) uses other environment variable like DATABASE_HOST. For MySQL you can use:
spring.datasource.username=${DATABASE_USERNAME}
spring.datasource.password=${DATABASE_PASSWORD}
spring.datasource.driver-class-name=com.mysql.cj.jdbc.Driverspring.datasource.url= ${DATABASE_HOST}
Make sure that those variables are created on your app settings page (Qoddi creates those variables automatically when you deploy your database at the same time as your app).
Reach your app from another app
Inside your app stack, you can reach any other Qoddi app member of this stack on any port. Qoddi automatically routes the traffic internally and opens the appropriate port. By opposition, your app is only reachable on ports 80/443 outside Qoddi.
To reach your app internally, retrieve the internal name from your app settings page :
This name can be used to reach your app from another app inside the same stack. Use it in any form that works with your script :
http://<internalname>
<internalname>
http://<internalname>:port
Note: https:// is not available, all the traffic inside apps is already encrypted by the cluster.
Encryption
Qoddi uses at rest encryption for the app virtual disks, build images, and encrypted transport from inside the cluster. To make sure the traffic is encrypted between your app and the browser of your users you can set up SSL certificates for any domain name connected to the app (including Qoddi’s default domain name).
Scale your App
From your app settings you can scale your app vertically and horizontally: by upgrading the app size (refer to our pricing for app sizes details) or by adding more nodes.
Additional nodes will run another copy of your app inside another FlashDrive server located inside the same cluster (same geographical location). Traffic is automatically sent to the least occupied node by Qoddi’ss load balancer.
Was this helpful?
15 / 1